Returns Handling
Returns are a vital part of any online business; customers buying online without seeing the product beforehand need to have the confidence of knowing that they can return their order for a refund or exchange if it's not to their liking - for whatever reason. A good returns policy can often make the difference between winning and losing a sale and retaining a long-term customer. Returns should be treated with as much importance as the initial order and made as frictionless as possible for the customer.
Customers like:
- Easy returns - everyone likes a pre-paid returns label with a few different drop-off and no-printer options!
- Long return periods - the legal minimum is 14 days; whynot stretch that out to 30, 60, or even 90 days?
- Refunds rather than credits - you are legally required to give a full refund in most instances.
- Transparent and informed processes - let customers know what's happening along the way!
- Fast returns processing - 90% of our returns are now processed within 24 hours so you can provide the best customer service.
Customers dislike:
- Hidden or complicated returns processes
- Refusing returns
- Insisting on a credit note instead of a refund
- Chasing returns up
- Waiting a long time for their refund
Some sectors will naturally have higher returns than others, eg, clothing and apparel, and these sectors will particularly benefit from a customer-friendly returns policy. Order Dispatch already has some features built in to help this run smoothly for you and your customer, and we are always working on new and exciting improvements to enhance this further.
Order Dispatch Returns
Order processing on Order Dispatch falls into three main areas:
- Creating postage-paid, ad-hoc returns labels for a customer, or including postage-paid labels with the outgoing parcel
- Allowing customers to create their own returns labels via our returns portal, either postage-paid or paid at the post office
- Post-return, viewing what has been returned and actioning the returns appropriately
Creating ad-hoc postage-paid returns labels
This method is used when a customer has been in touch about returning an order, and you would like to give them a pre-paid returns label that they can drop off at their nearest Evri Parcel Shop. This will be free for the customer and will be billed to your account at the rate shown when you create the label, which varies with weight. It is important to ensure that you have selected the correct items (and, therefore, the correct weight), or the return may be held and/or have surcharges applied.
Advantages of ad-hoc labels
- Provide a customer with a free returns option
- Control over the process - customers need to contact you to obtain a label
- Flexibility for the customer - 1000's of ParcelShops nationwide where the parcel can be dropped off; many open late at night
To create a returns label, you will first need to locate the order on the processed orders screen, view the order, and click on the 'Return Label' tab:
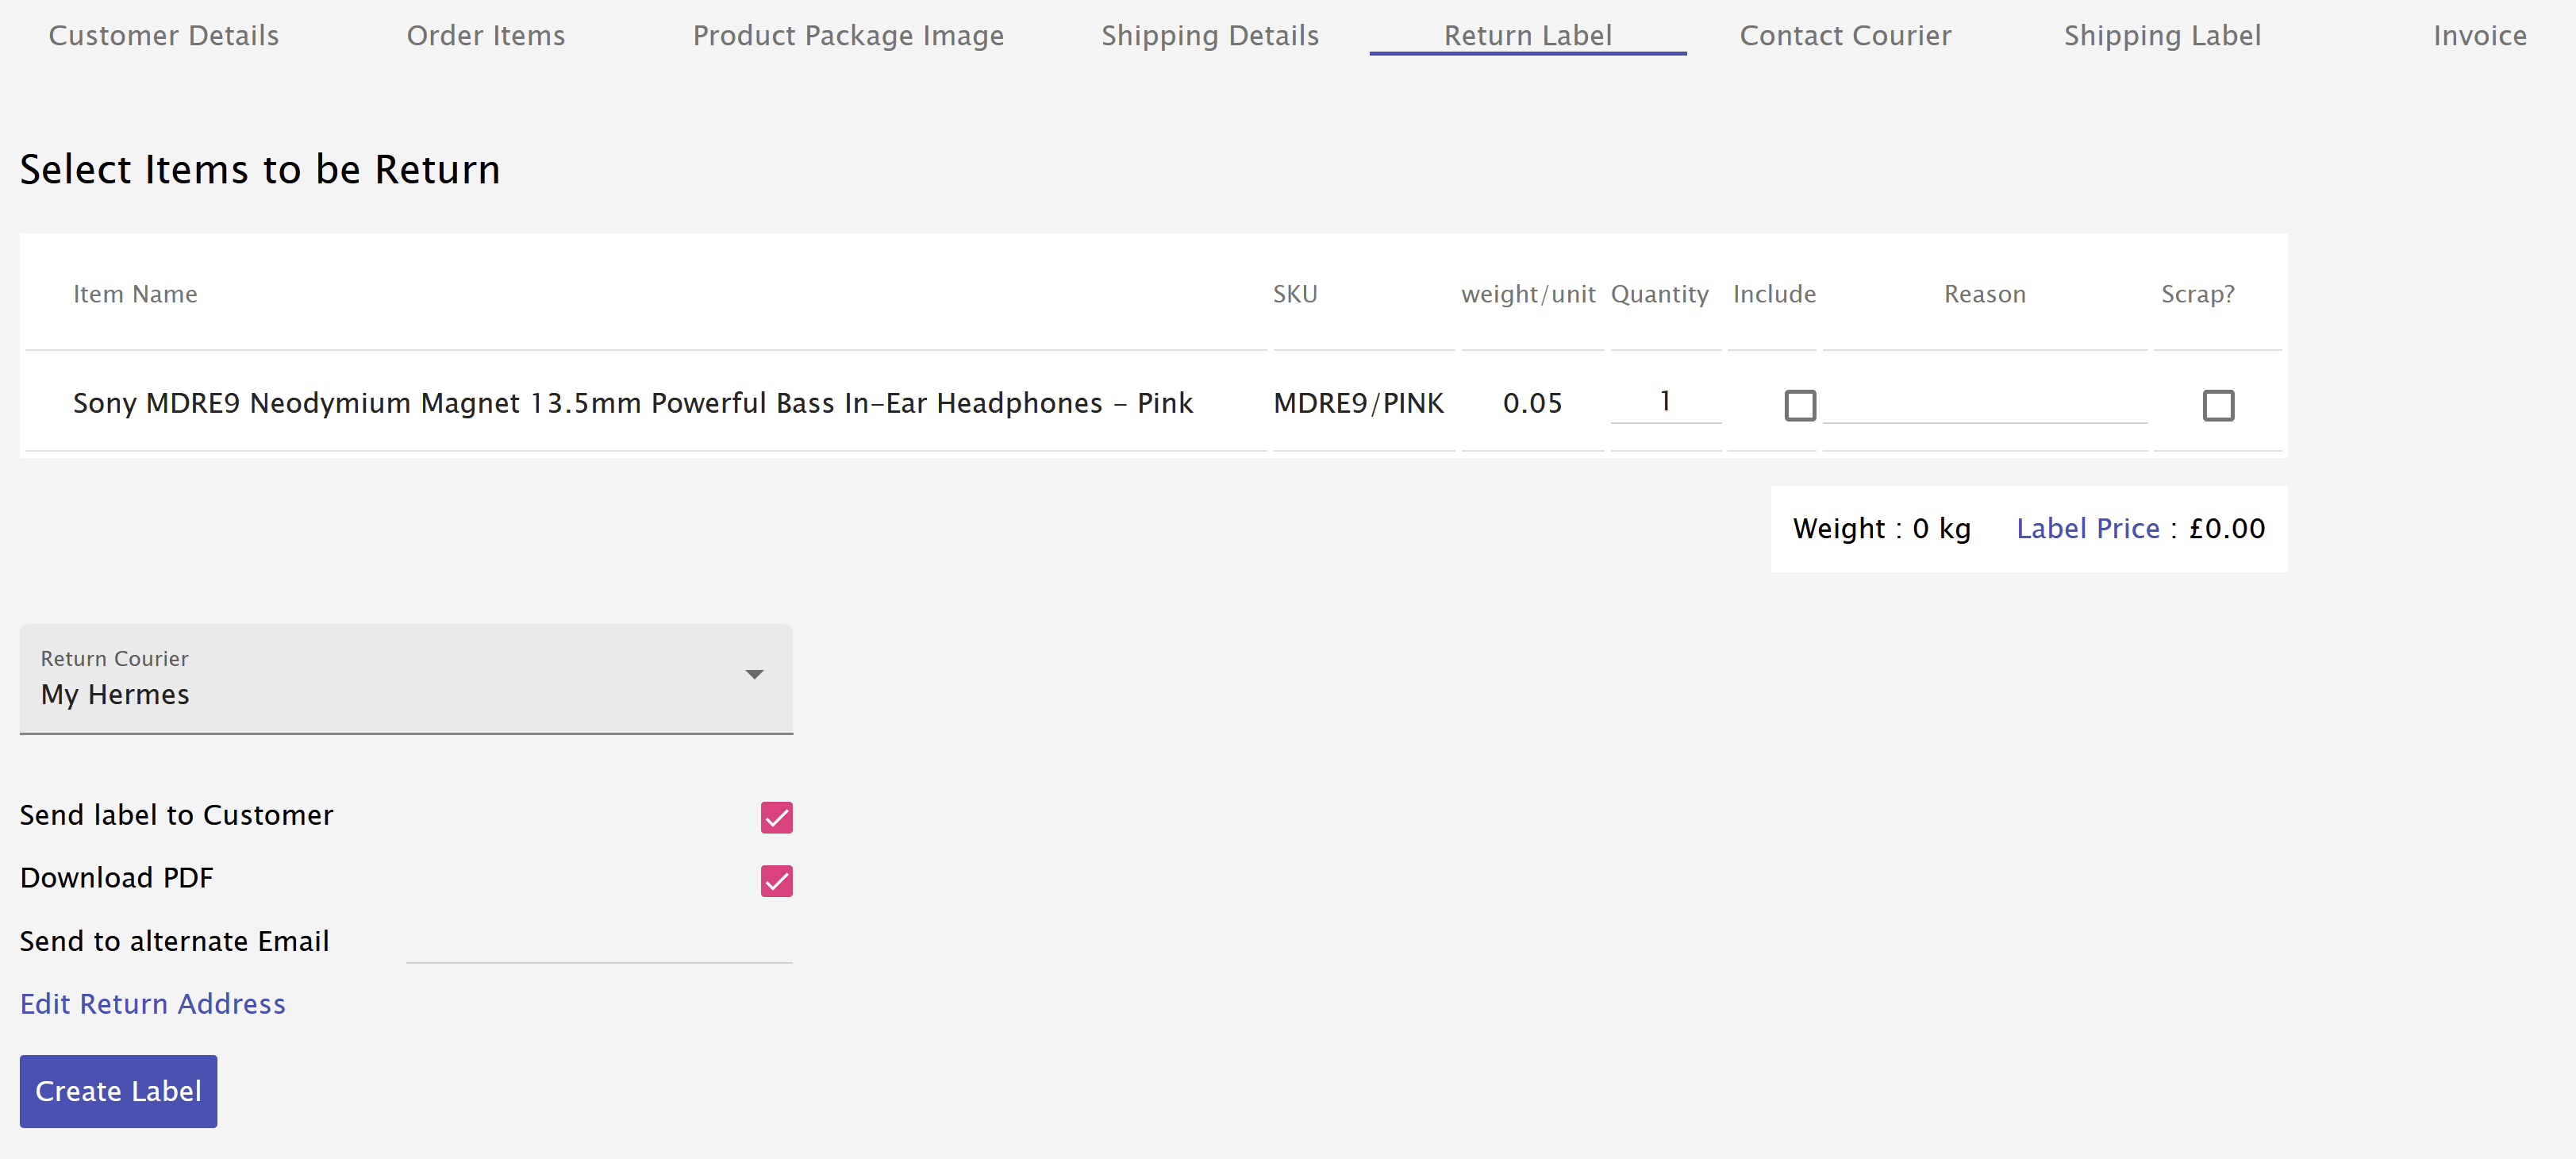
- Tick the 'include' checkbox next to all items that will be returned, and adjust the quantity if the customer is not returning all of the ordered items for that product.
- Enter the reason for return in the 'Reason' box; this will help the returns team know why the item has been sent back and what should be done with it.
- If the customer has reported the item as faulty, and you don't want it to be re-stocked, tick the 'Scrap?' checkbox; the item will then be quarantined as per your returns process and kept with your other returns to be consolidated and returns to you at a later date.
Once you are happy with the selection, five options above the 'Create Label' button can be configured as required.
- Return Courier drop down - this can be used to select between My Hermes (default) or Royal Mail. My Hermes has a large network of Parcel Shops where a customer can drop off the parcel, and Royal Mail has a large network of Post Office counters for the same purpose. Both options will return the parcel with full tracking and in a similar time frame, so it is purely a personal preference to suit your customers.
- Send label to Customer - if this is selected, the label will be emailed to the email address stored for the customer on our system automatically, so you won't have to send it to them separately. Still, you can uncheck this if you'd prefer to send it in an email conversation you already have with the customer for a more personal touch.
- Download PDF - this will download the PDF to your computer so you can email it to the customer directly.
- Send to alternate Email - enter another email address here to send the label to; it may be an alternative email address provided by the customer, someone else in your organisation, or any other email you'd like it to be sent to.
- Edit Return Address - You can change the return label's default wording or even enter a different address completely. This can be used to have products returned to your location instead, which is particularly useful for quickly getting faulty items back for repair or inspection.
Once everything is set, you can click on 'Create Label', and the label will be created:

If you've chosen to send the label to the customer, it will have been emailed to them; otherwise, clicking download will download the label to your computer.
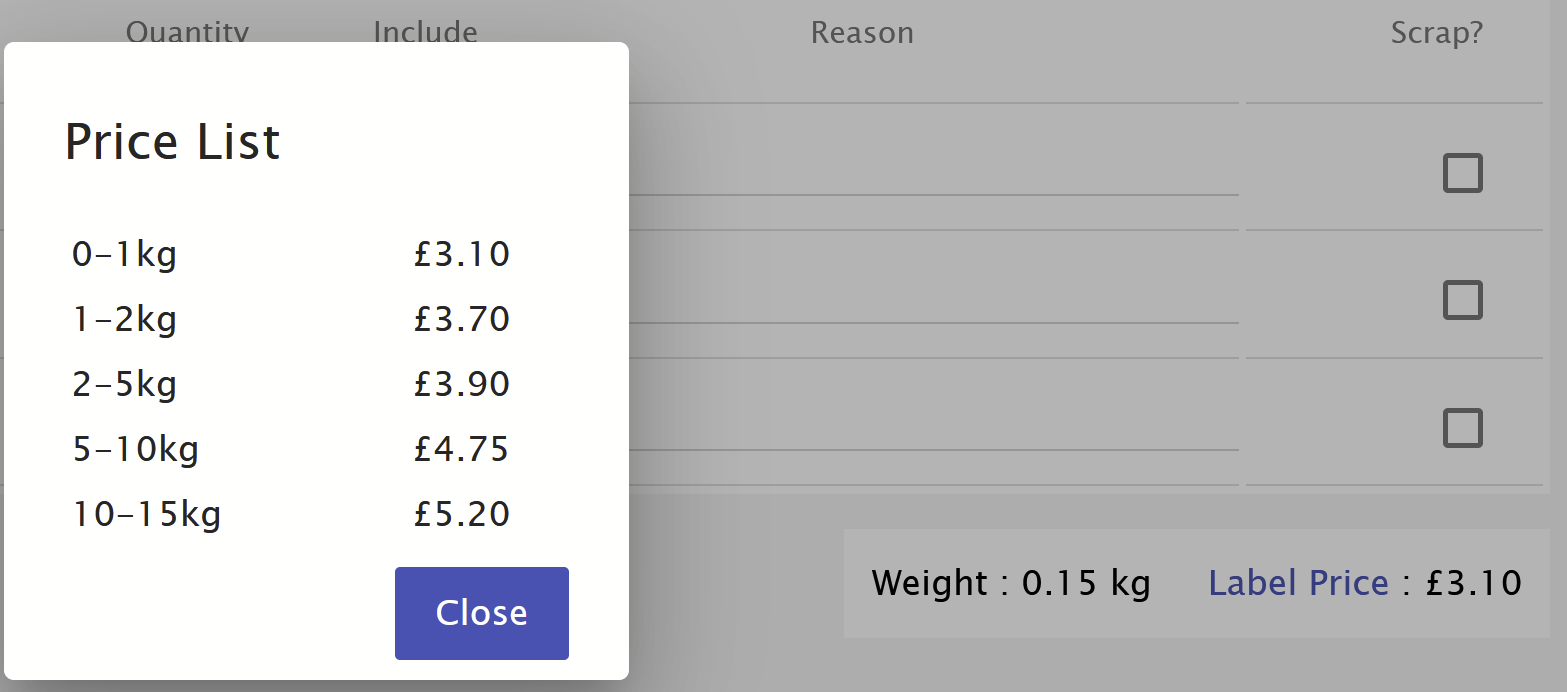
Before creating the label, you will see the price noted at the bottom of the item list; this is what will be added to your monthly invoice. You can also click on the 'Label Price' text to see the current price list:
Including pre-paid returns labels with orders
Order Dispatch includes an option to automatically print and include Royal Mail Tracked 48 returns labels for your orders. Returns labels are printed onto self-adhesive labels and included inside every applicable parcel so that the customer can return the order at their convenience from any Postoffice. This is an ideal solution for businesses expecting high numbers of returns to give the easiest return process for customers.
Advantages of including pre-paid returns labels
- Easiest return options for customers - the label is pre-paid and pre-printed
- Fire and forget - no customer service action is required to provide a label
- Economical - only pay for labels that customers use
- Drive customer confidence and repeat orders - an easy returns process strongly encourages future orders
This can be enabled at Settings > Courier Settings:
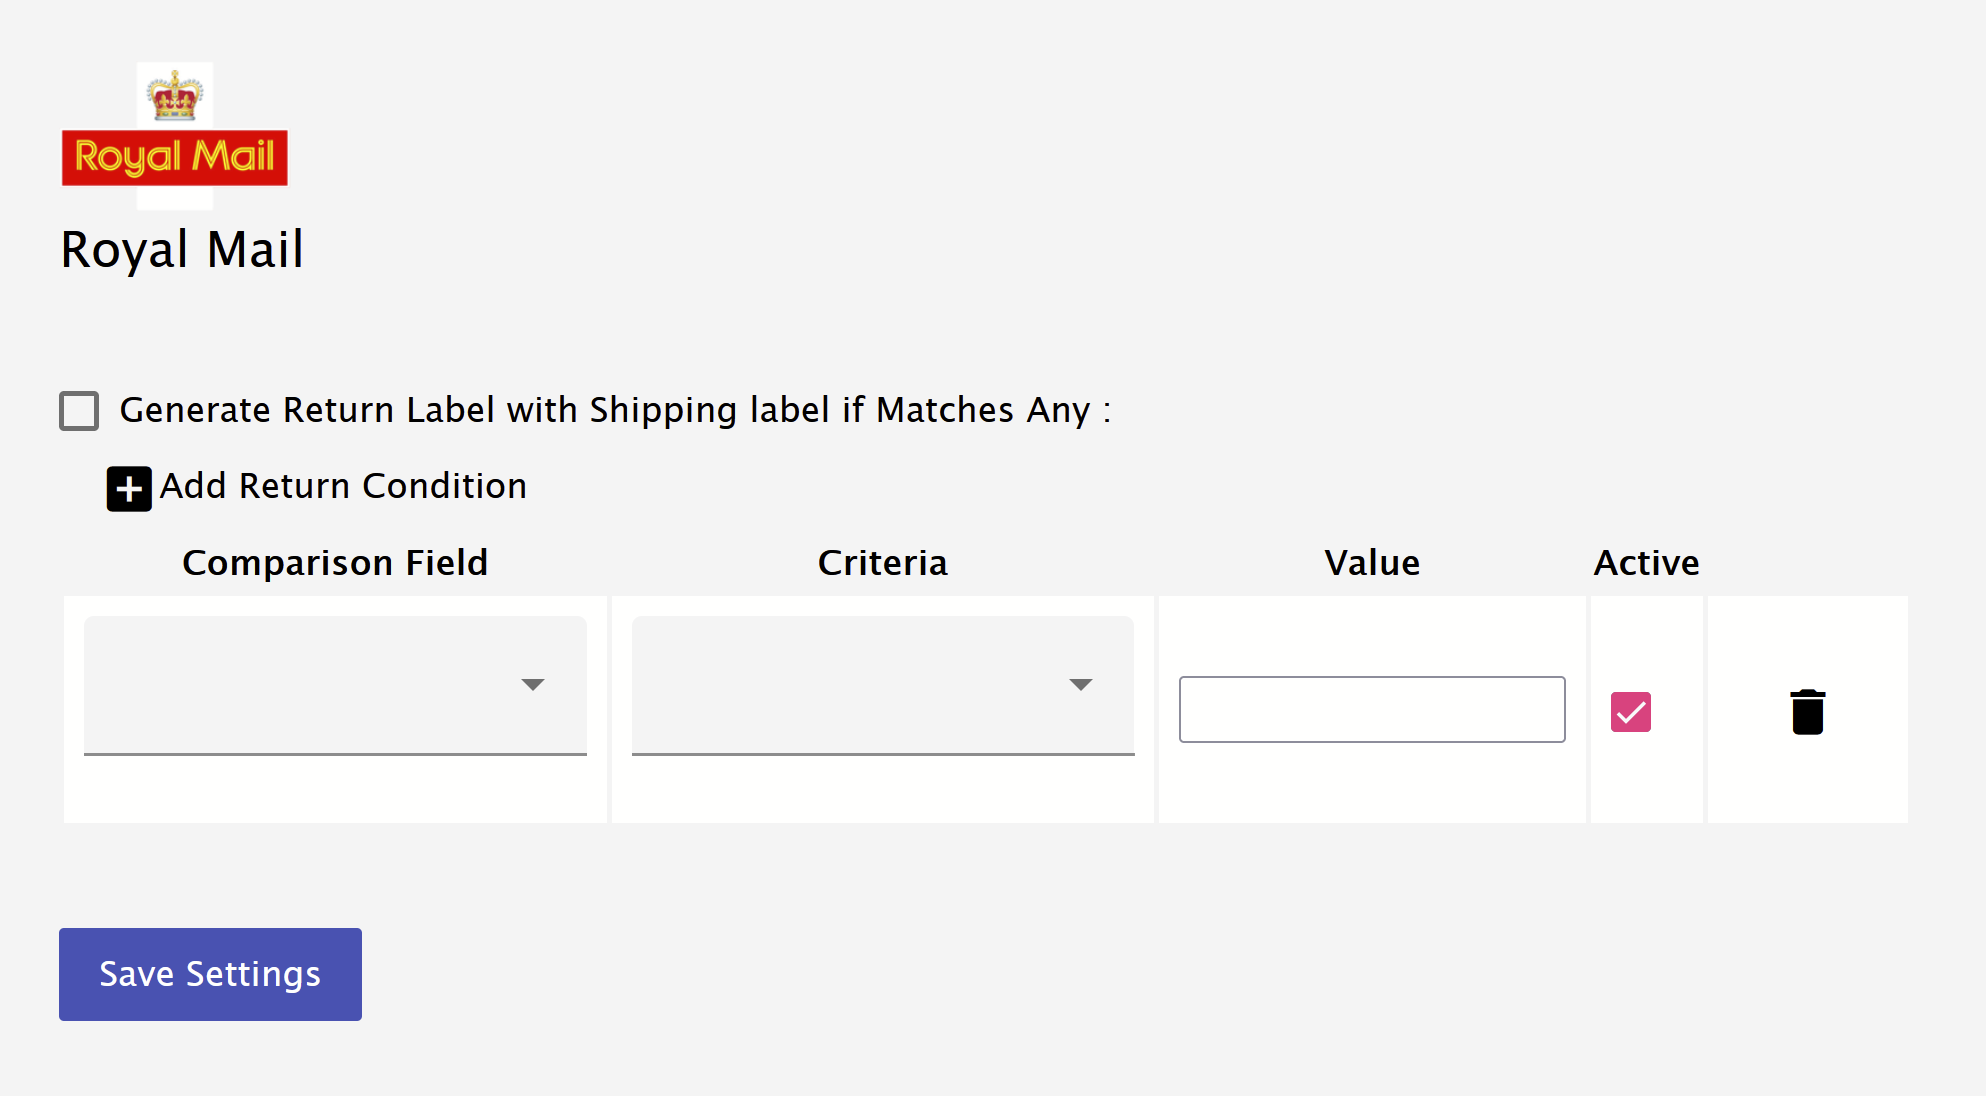
Ticking the 'Generate Return Label' checkbox will turn this feature on for all orders. If you would like it to only apply to certain orders you can choose from:; for
- SubSource
- Your Reference
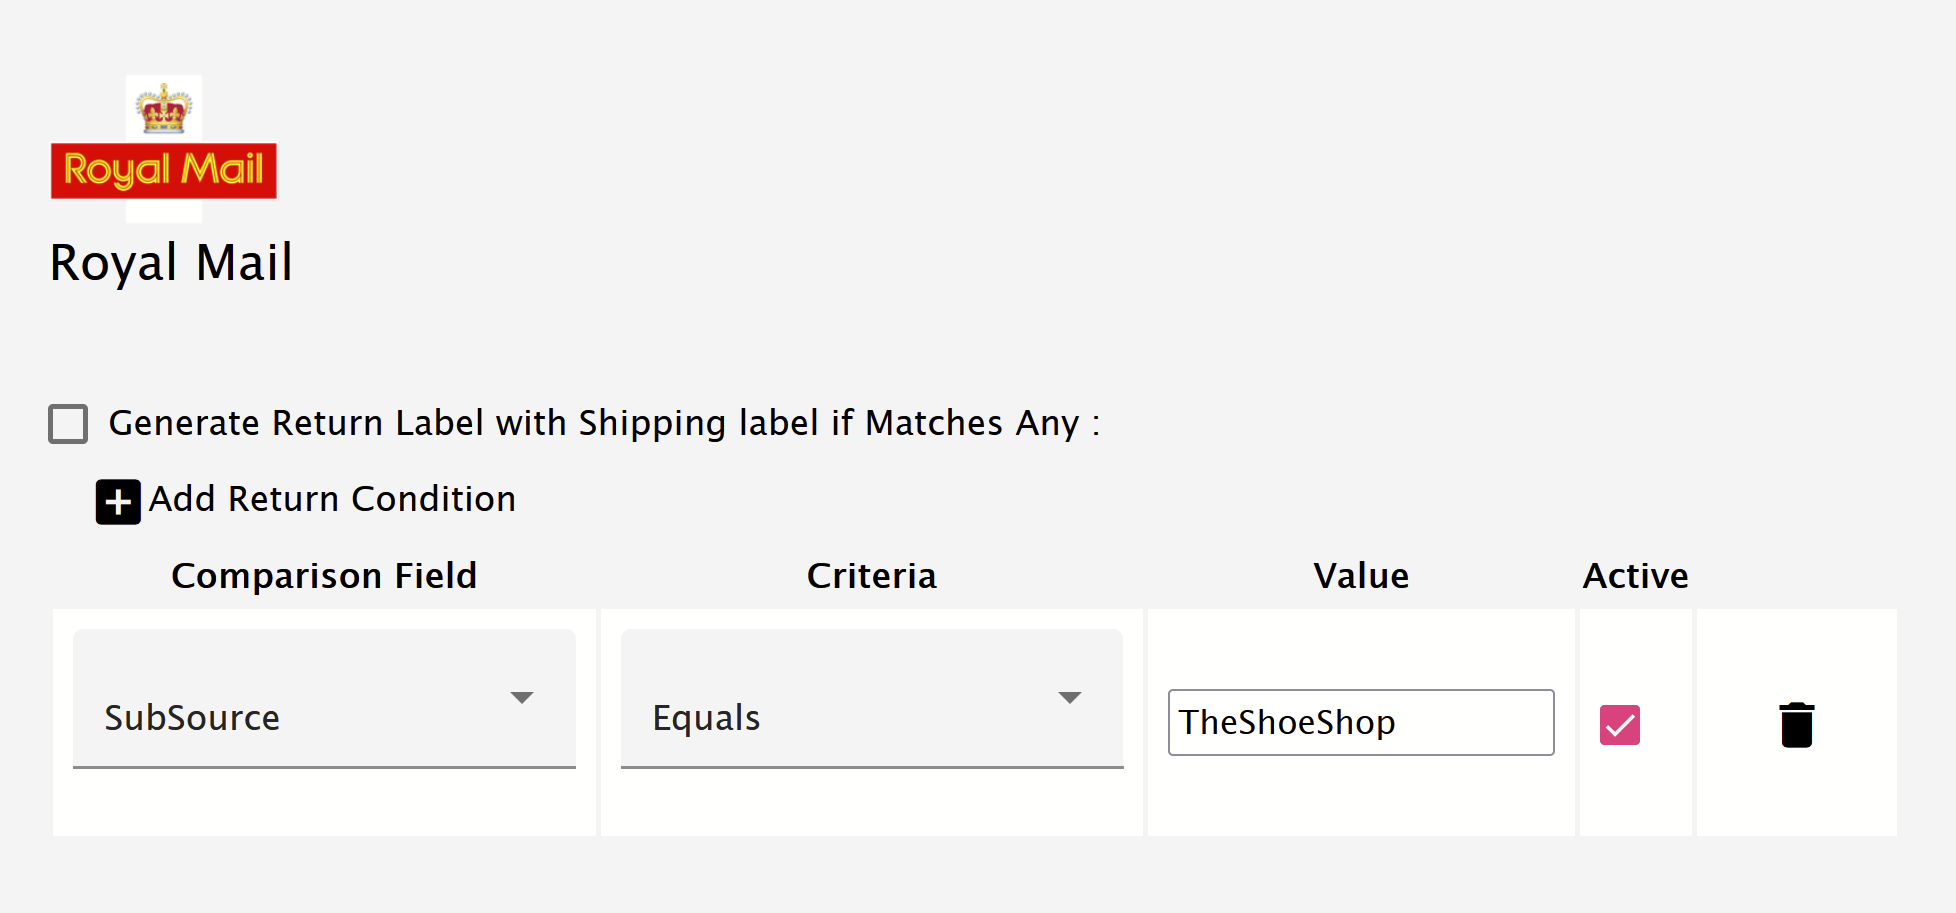
SubSource - you can enter a source name for one of your connected selling channels, for example, you may have a retail store and a wholesale/trade store, and you only want to print returns labels for the retail customers. For this,it will usually be required to use an 'Equals' criteria since the SubSource name will always be the same. If your retail store was called 'TheShoeShop', you could set the matching as below:
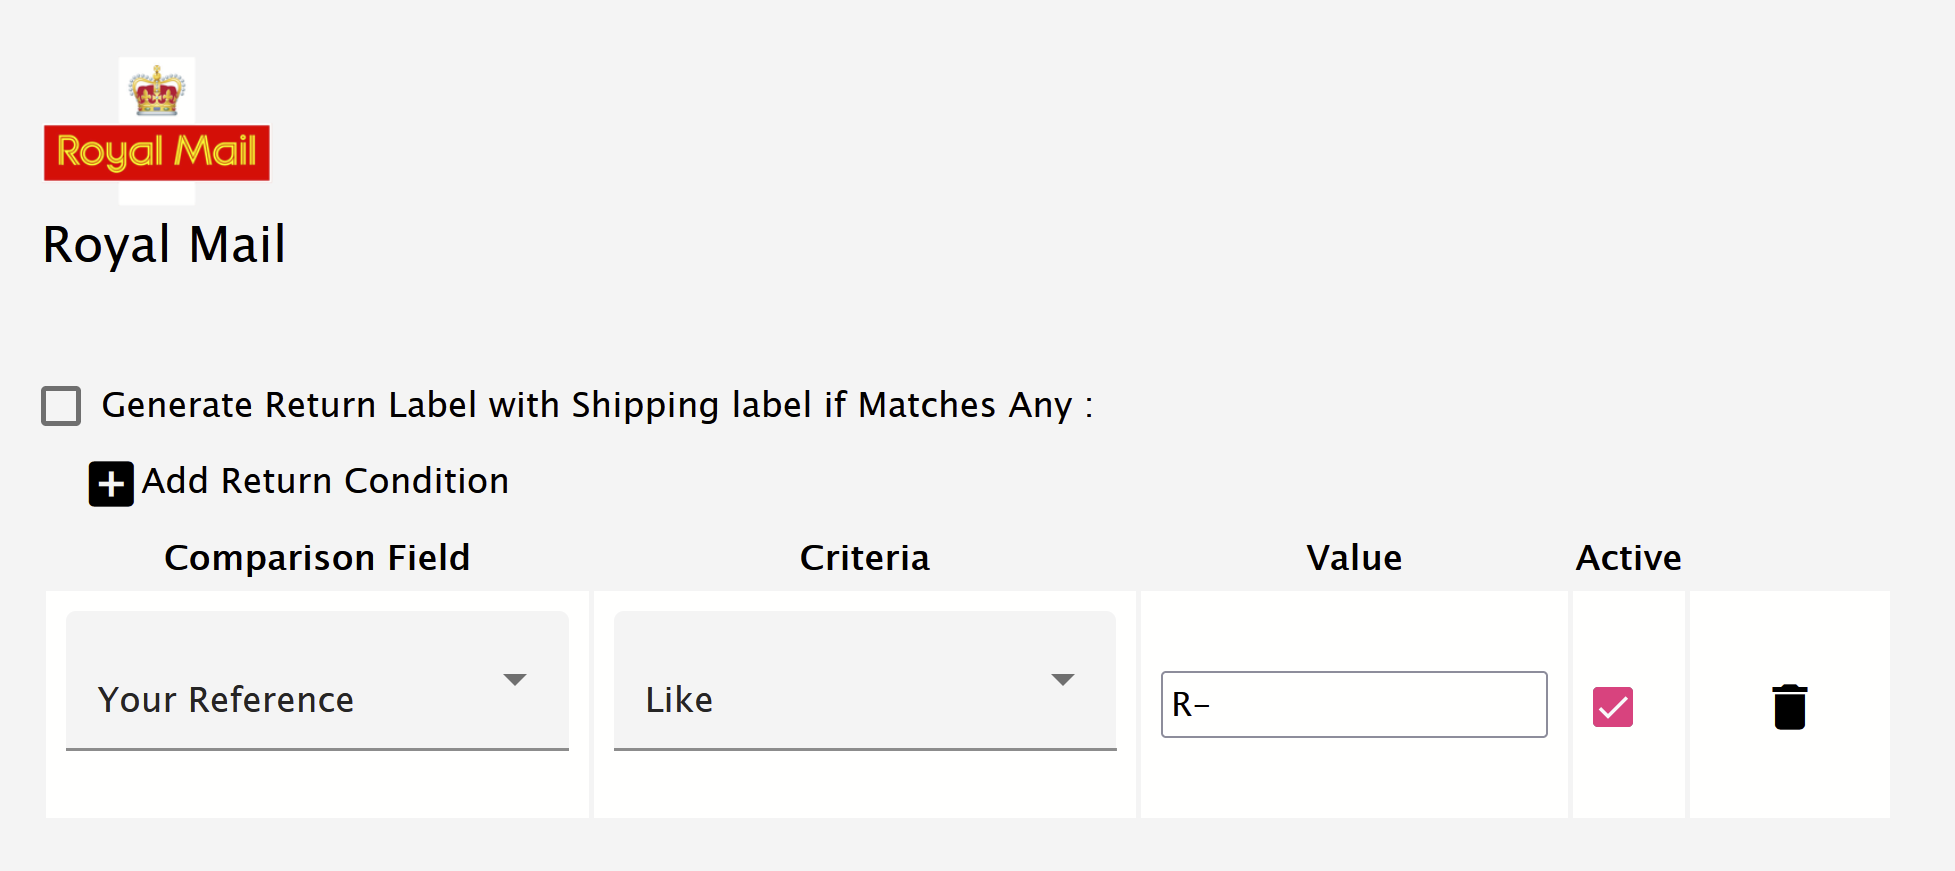
Your Reference - this will allow you to match certain orders based on order reference matching, in a similar way to matching the SubSource. For this, it will usually be required to use a 'Like' criteria to match partial order references. For example, if all of your retail order references started R-, you would set the matching like this:
It is also possible to set multiple criteria, and the system will match any of them to print a label.
If you have a use-case that requires matching a different order field, please contact us, and we will see if it is feasible to add.
Once enabled, returns labels will automatically print for each order. There is a small environmental charge for each label printed, but the cost of the return is only charged if a customer uses the label. The customer just needs to stick the supplier label back onto the parcel and drop it off at any Postoffice.
The returns portal
The returns portal is a web page you can share with customers that allows a customer to register a return on the system and receive either a label to print at home or a QR code to print a label in-store when they drop off their parcel. Customers can pay for their return label via PayPal or card if you have not enabled a free returns option or their order does not qualify. The returns portal can be configured in a number of ways:
- Free returns for all orders - all returns options will be free
- Free returns if the customer chooses that the item is faulty - if the customer has indicated that the reason for return is a faulty item, then the returns labels will be free; otherwise, for other return reasons the customer would be asked for payment.
- Generate a code to give to the customer to get a free return - create a voucher code to give to customers to allow them a free return; this can either be a single-use code that you give to a specific customer or a multi-use code that you can send to any customer with an issue.
Advantages of the returns portal
- Easy, self-service, process for the customer
- Minimum customer service input, customers have access to the portal and can arrange their own returns
- Visibility of incoming returns because the customer has to log their return to get a label
- Pre-paid and customer-paid options
- Print-at-home and print-in-store options
Enable and setup
The returns portal is enabled at Settings > Return Settings:

Here you can configure the URL of the returns portal for your account; this will be the URL that you share with your customers to access the returns portal. In the above example, the URL for your customers would be https://www.orderdispatch.co.uk/returns/TheShoeShop; you could link to this from the returns page on your website or include it with order confirmation emails.
You can also set/update the returns address for your parcels and the business name that will appear on the labels. You can choose to leave the returns to be delivered to our address to be processed for you, or if you are handling your own returns, this can be set to your own address.
At the bottom of the settings page, you can set your company information, returns policy, and refund policy that will be visible to customers on the returns portal:
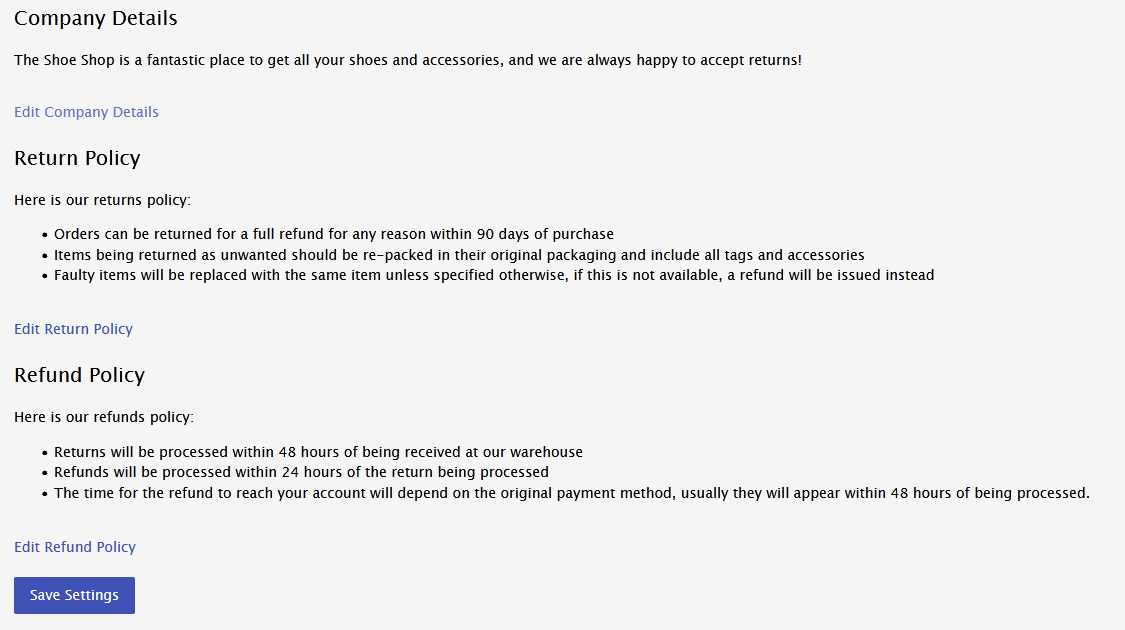
Some default text will be present if you don't enter anything, or you can overwrite it by editing any sections.
Once you have saved the settings, the returns portal will become active on the URL you have created.
Customer View
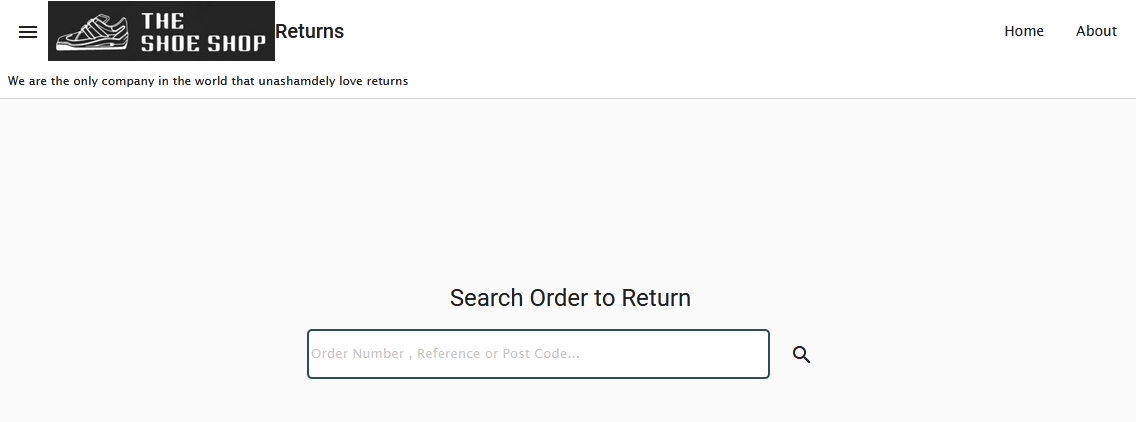
For a customer visiting your returns portal, this is what it will look like,
Home page:
'About' page:

Note: the logo can be configured at Settings > Branding
The process for a customer to return an order
Locate the order by searching by:
- Our system order number
- Your website order number, or marketplace order number from eBay/Amazon etc
- Customer postcode
- Customer email address
The customer is then presented with a list of their matching orders to return:

The customer then clicks on 'Return Items' to choose the items they would like to return:
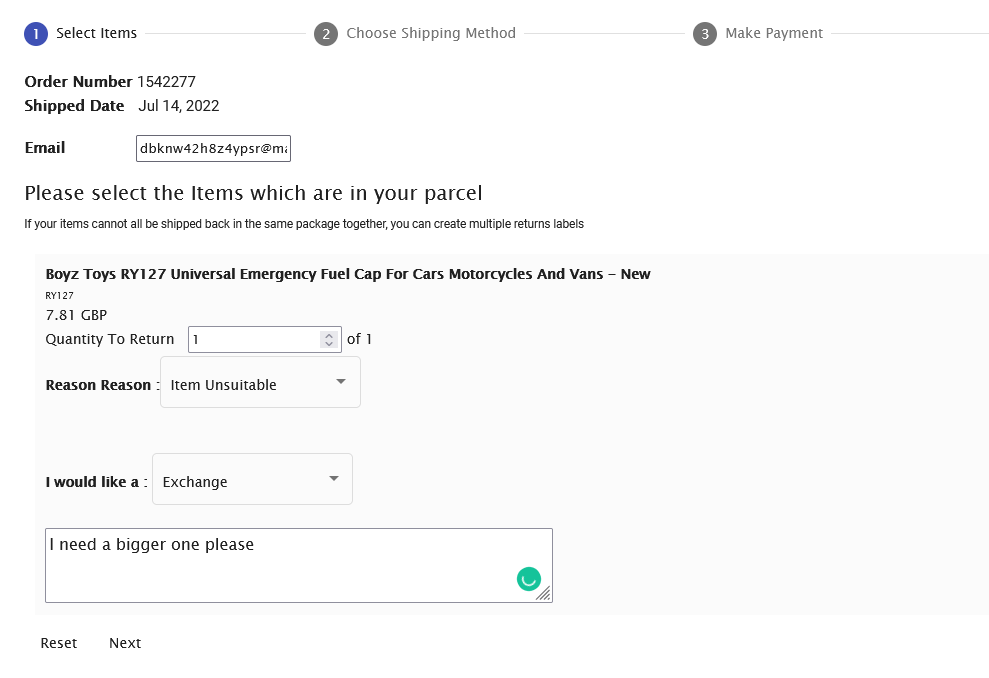
The customer can indicate the quantity they are returning, as well as the reason for returning that item, and what action they expect the retailer to take. This means that all the required information to correctly process the return is captured at the time the return is placed on the system.
After clicking next, the customer is presented with a number of options, depending on the weight of the order.
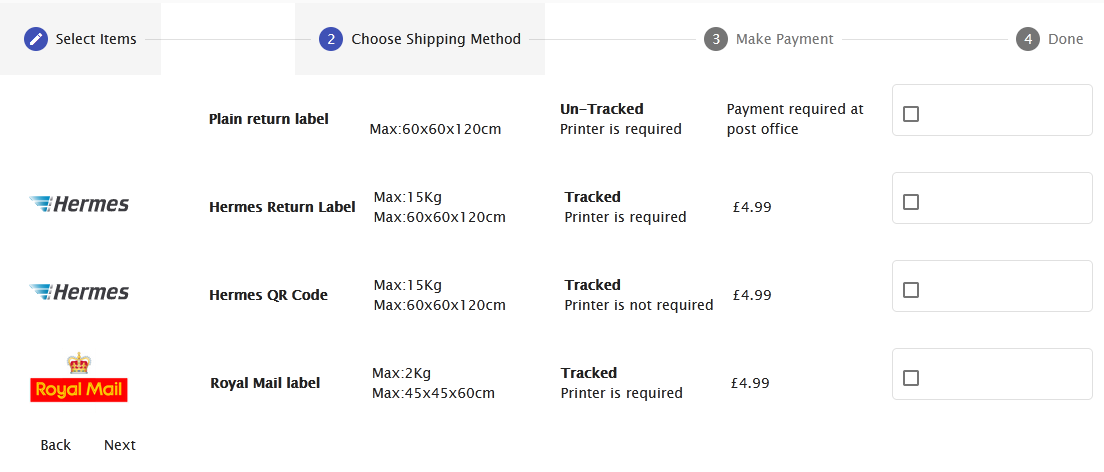
The options are:
- Plain return label - this will be a generic label with the order details and the return address; the customer can stick this onto the parcel and then pay for their own postage with any service they choose.
- Hermes return label is a print-at-home service that can be dropped off at any Hermes(Evri) ParcelShop.
- Hermes QR Code - this option will give the customer a QR code which they can use to print the label in-store when dropping off their parcel at a Hermes(Evri) ParcelShop.
- Royal Mail Label - this is a print-at-home service that can be dropped off at any PostOffice
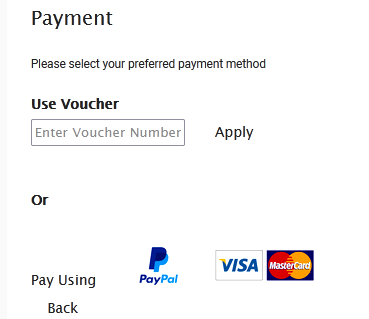
In the above example, the customer is not eligible for a free returns label, so would be expected to pay for their own return through the returns portal; PayPal and secure card payments are offered as payment options along with the option to enter a voucher code. The payment screen is skipped if you have given the customer free returns
After making payment, the customer is given their returns label and tracking number, and a copy is also emailed to them.
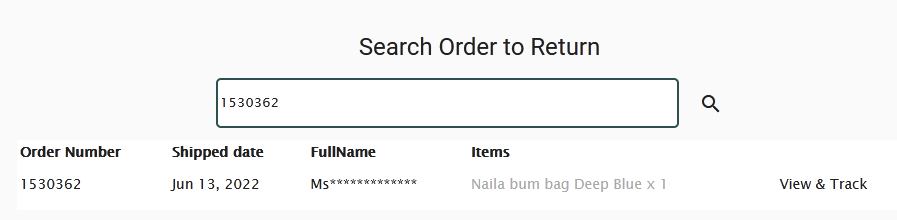
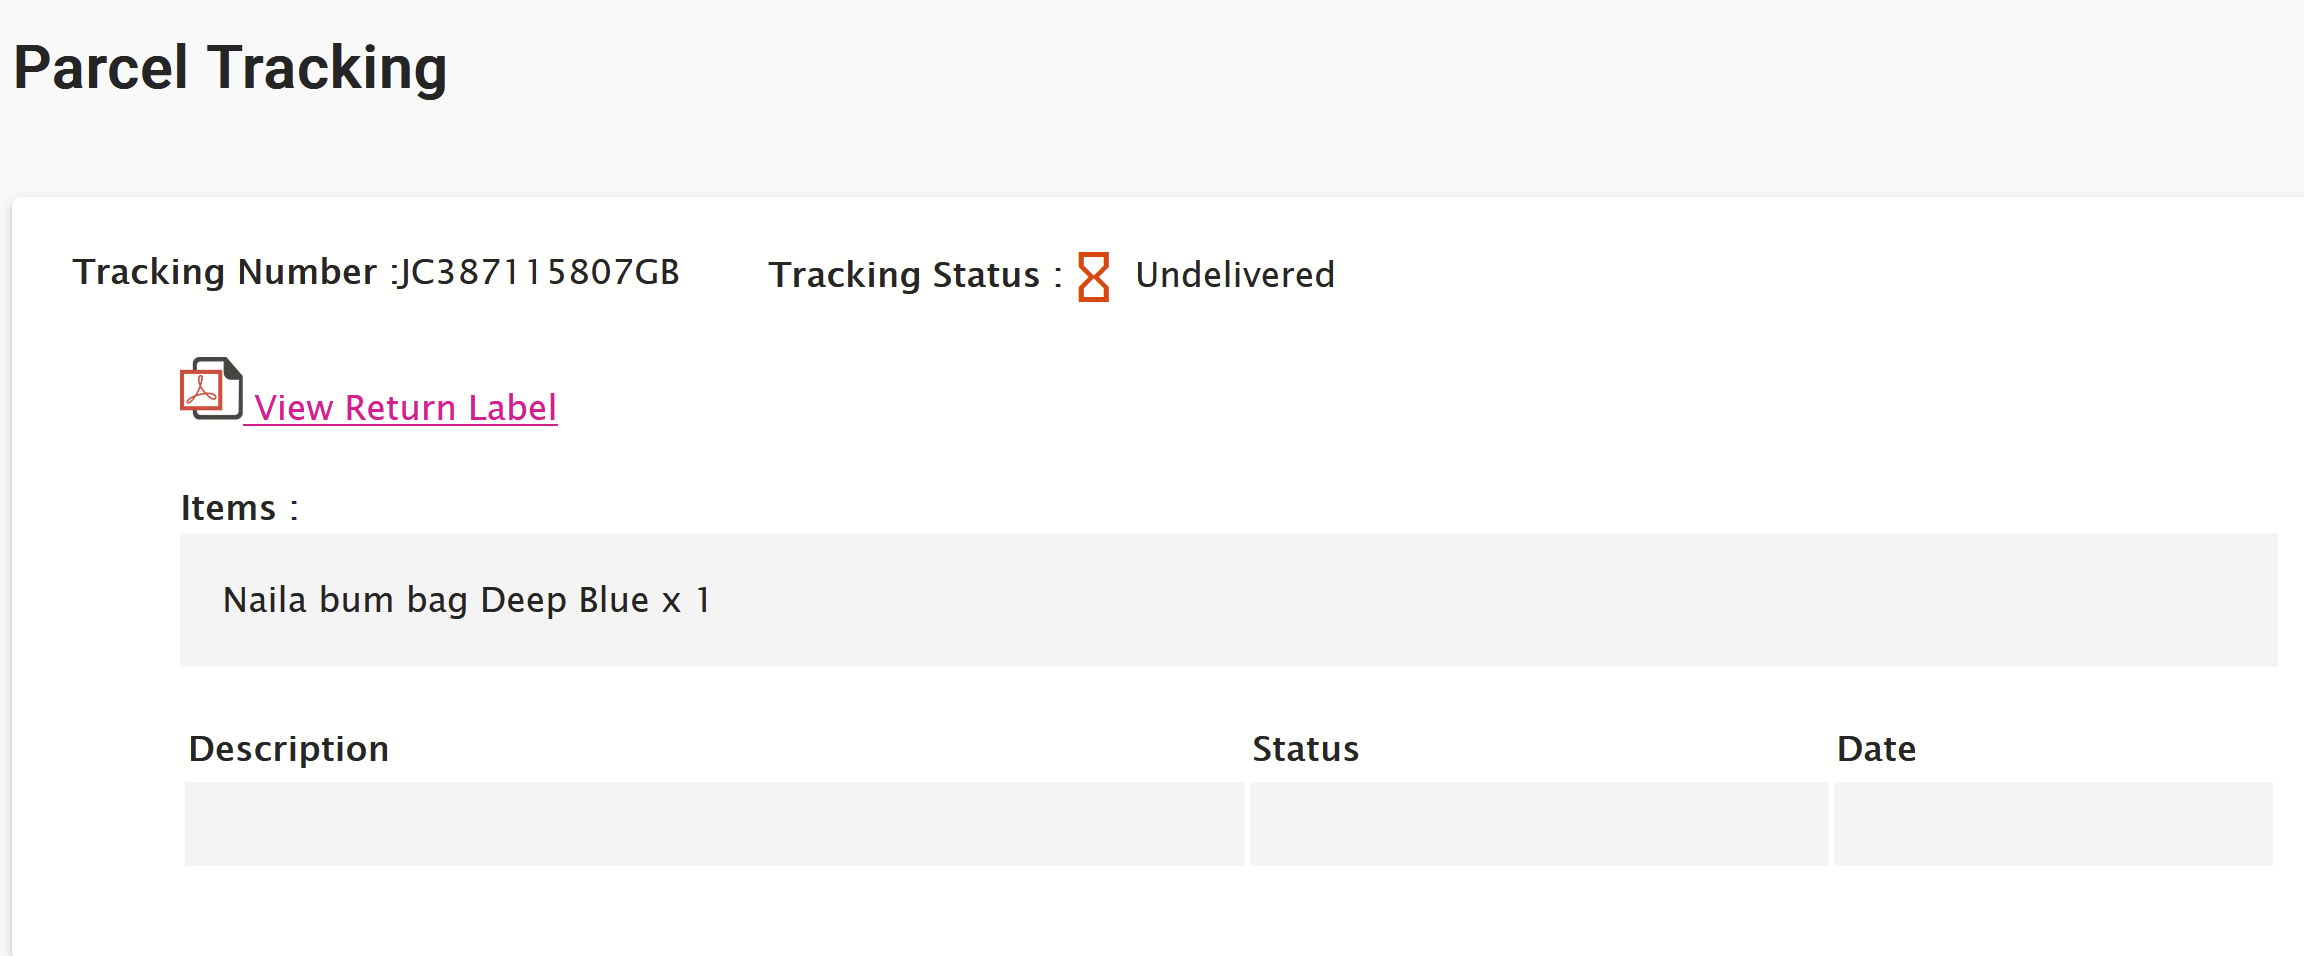
The customer can now return to the portal at any time to see the status of their return, if they search and find their order again, they will be able to view and track the return, and get another copy of the returns label, should they have lost the original:
Once the parcel is dropped at the ParcelShop, it will start to update the tracking
Post Return
Once a customer has either received a returns label as detailed above, or the customer has self-shipped the item back to our warehouse, the return will usually be processed within 24 hours of receipt, and the details will be visible on Order Dispatch.
Returns management screen
The returns management screen can be accessed at Orders > Returns. This screen has three main purposes:
- View a list of all your new returns
- Mark a return as 'acionted'
- Create resends and exchanges
The returns management screen displays a list of current returns based on the order they have been returned against.
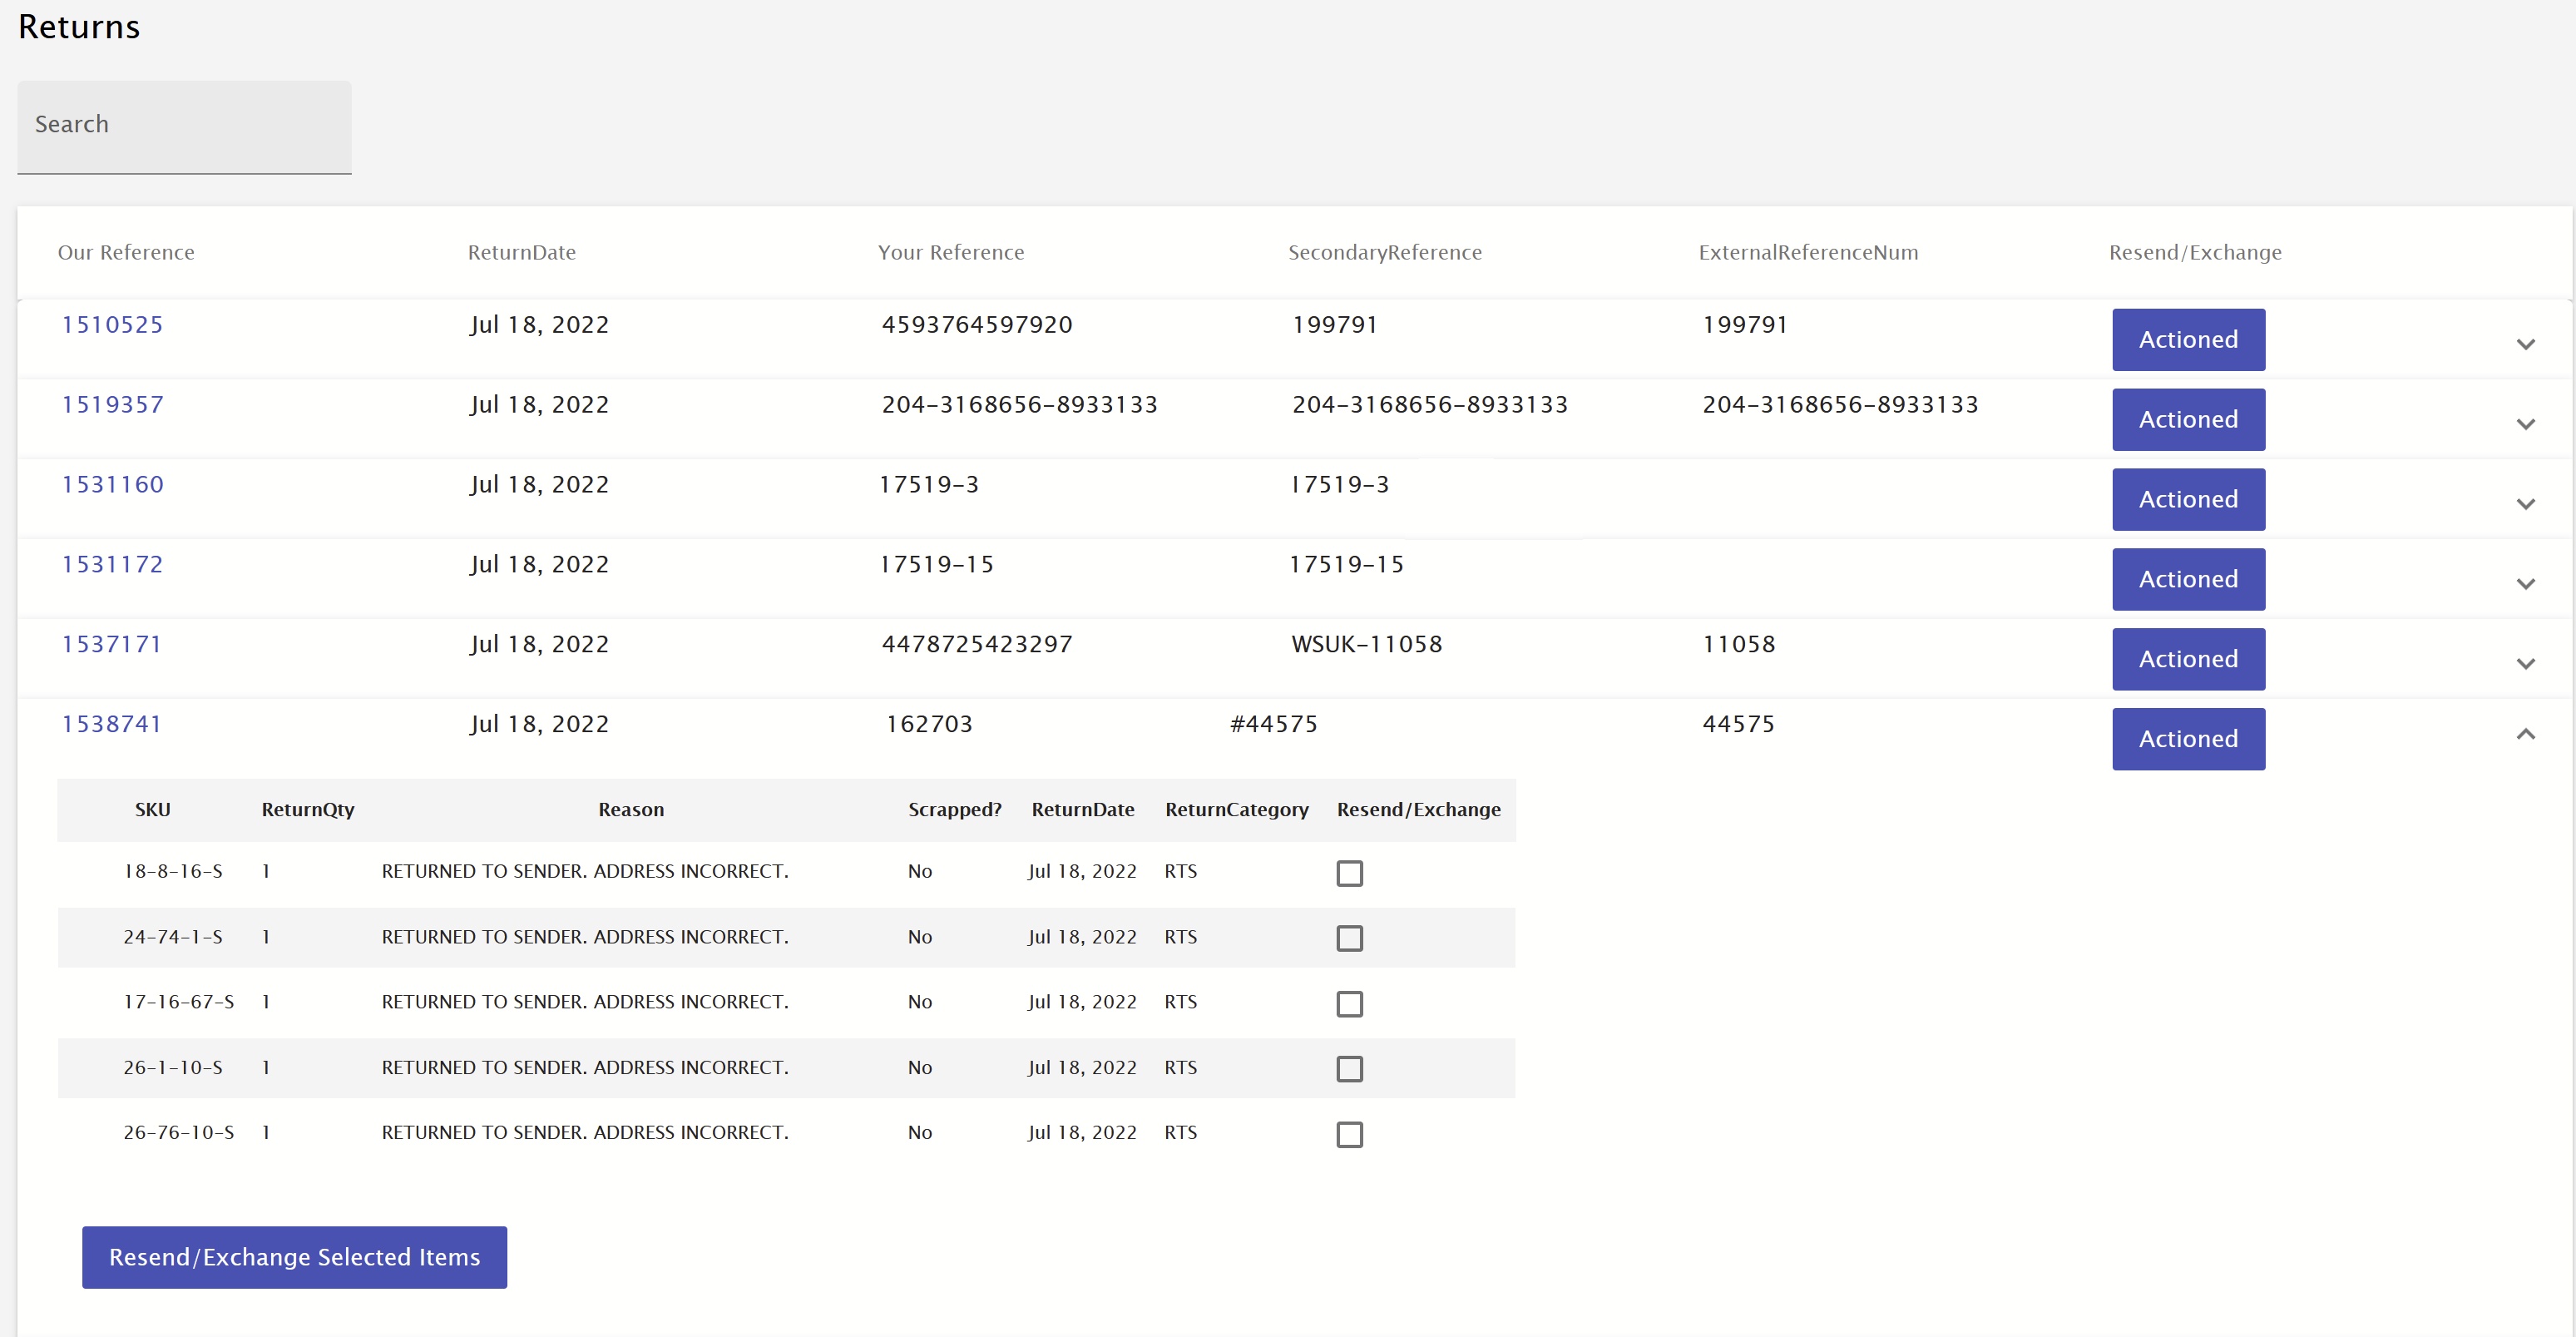
Clicking the arrow at the end of each order row will expand the order to view the specific items that have been returned for that order, and will also allow you to create a resend or exchange for those items directly from this screen.
Mark a return as actioned
The 'Actioned' button on each row will allow you to mark a return as actioned once you have dealt with it; this may be issuing a refund, replacing an item, exchanging an item, or any other applicable action. Marking returns that you have dealt with as actioned will allow you to keep this screen clear and only containing returns that need actioning, speeding up the workflow for your CS teams.
Clicking on the order number for any of the orders will take you to the complete order details for that order, and switch to the returned items tab at the same time.
Resend/exhange an order
Resend items to a customer can be completed from this screen in just a few clicks. To create a resend or exchange, tick the items that you would like to resend/exchange, and click on 'Resend/Exchange Selected Items':
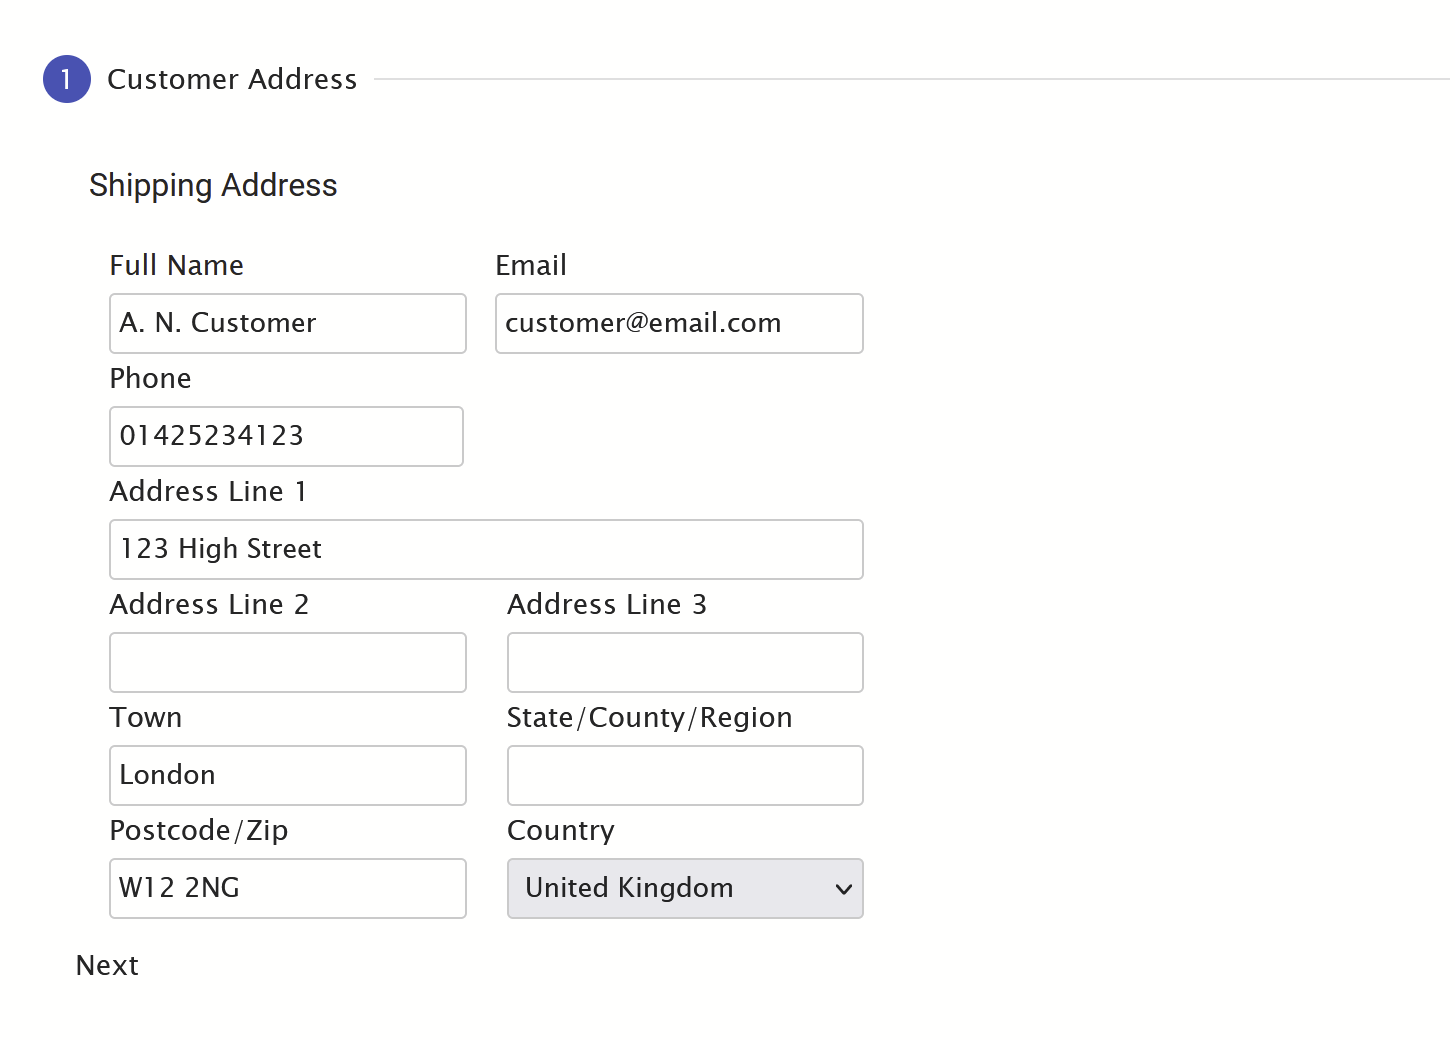
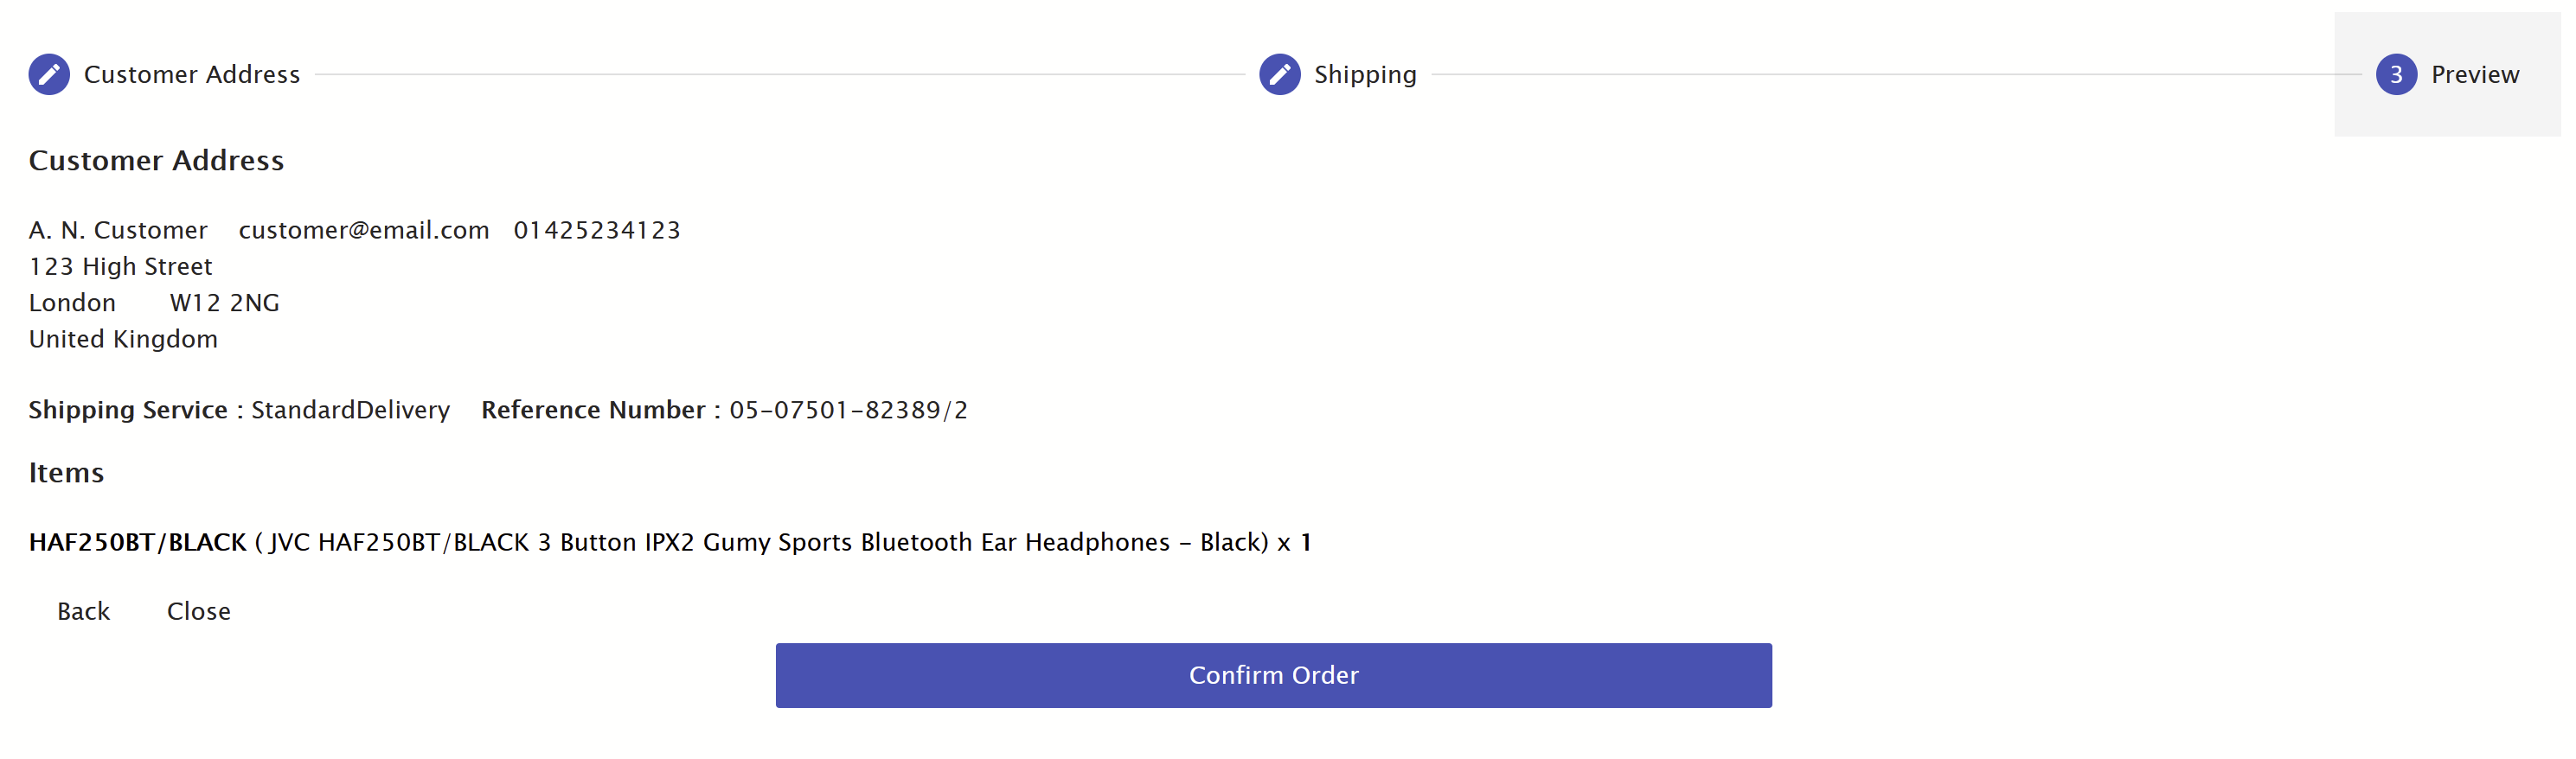
Step one will allow you to edit the customer address, useful if the order has been returned due to an incorrect or incomplete address. Once you are happy with any changes, you can click 'Next'
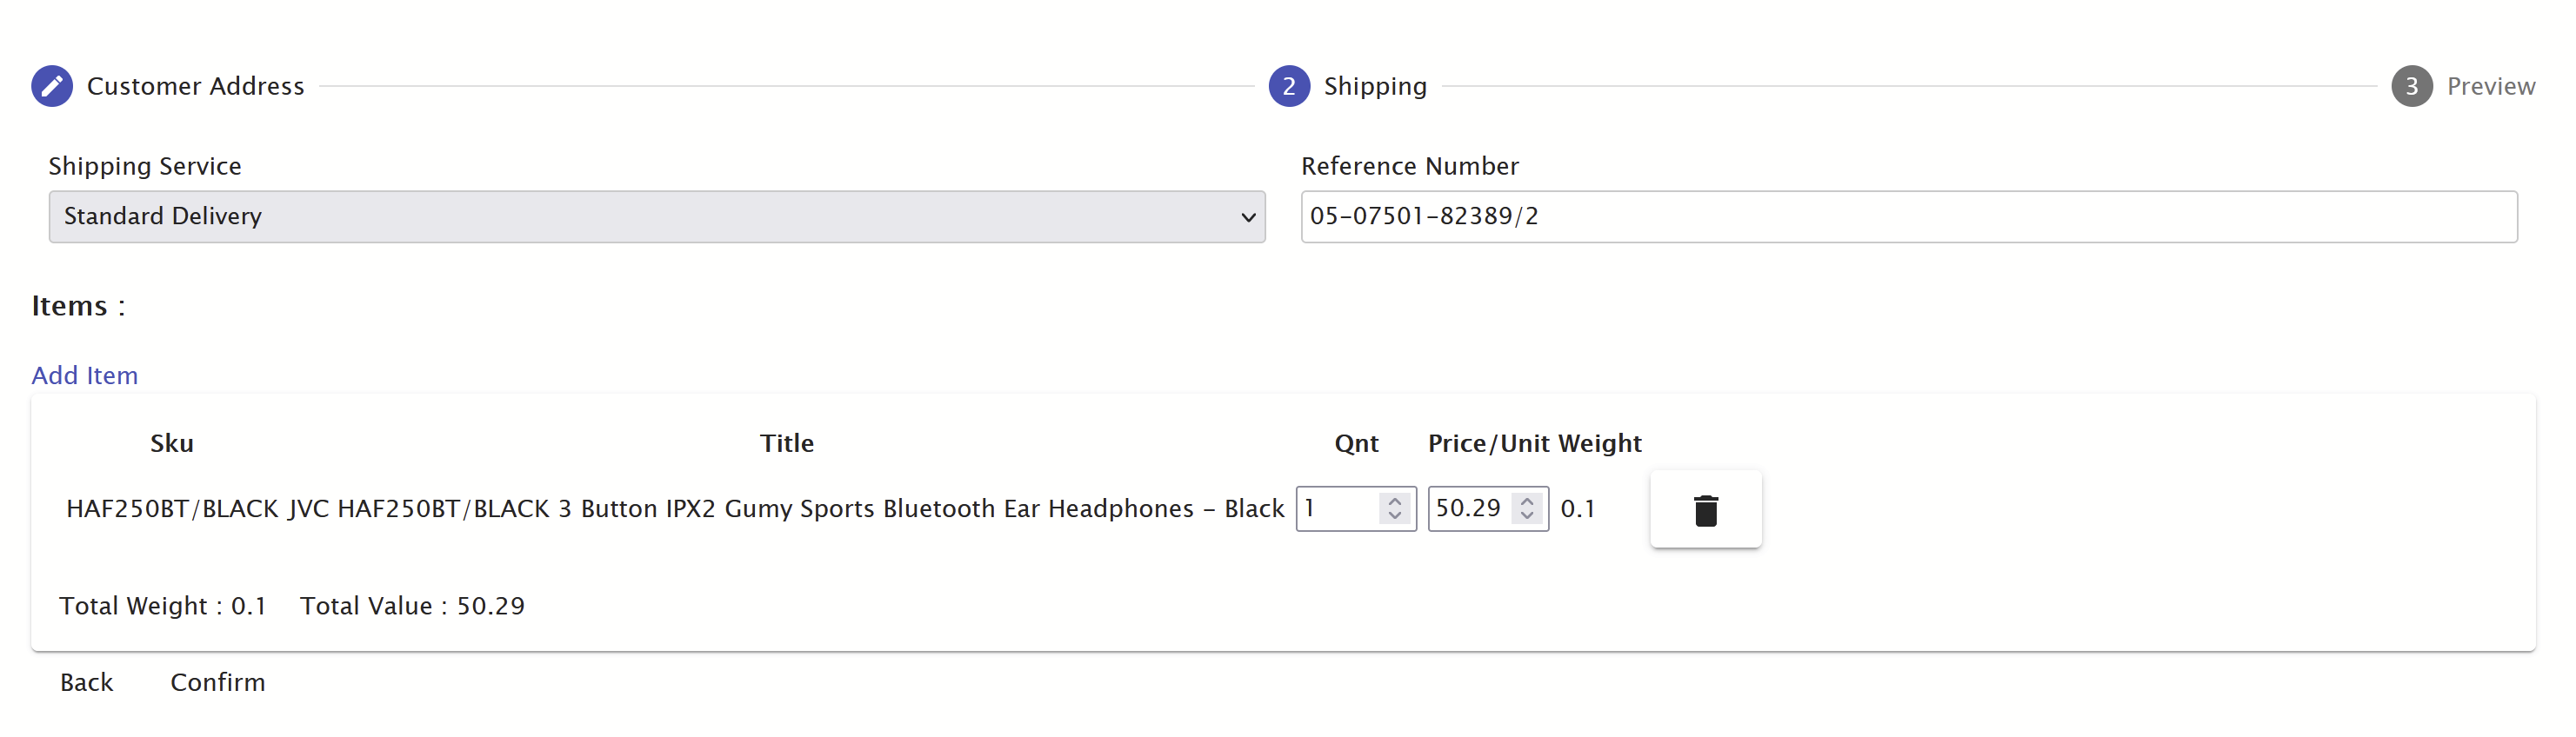
Step 2 will allow you to choose the shipping method, and edit the items on the order. If you are exchanging an item, you should add the new item and delete the current item from the order. You can also add any other extra items as required. The reference number will automatically be the original reference number with /2 added to the end. Once you are happy with the selections, you can click 'Confirm'
The final confirmation summary screen will show the details of the changes you have made so far. If you are happy with the changes, click 'Confirm Order', and the order will be placed on the system. If you need to make further changes, just click the back button to go back and update the order.